Create a launch configuration
In Visual Studio Code, the launch.json configuration file connects a debug session to the target hardware via a debug
adapter. The following explains how to create the file for single- and multi-core devices using different debug adapters.
The pseudo debugger types cmsis-debug-pyocd and cmsis-debug-jlink are available to set up the debug connection in the
launch.json configuration file. However, these are not full debug adapters but generate debug configurations of type
gdbtarget which comes with the
CDT GDB Debug Adapter Extension that is
part of the Arm CMSIS Debugger extension pack.
Note
Using pyOCD, you can connect to the target via CMSIS-DAP and ST-LINK debug probes.
Prerequisites
Make sure you have made the required changes to your CMSIS Solution-based project.
If your project does not yet contain a launch.json file, create it as follows:
- Go to the Rund and Debug view.
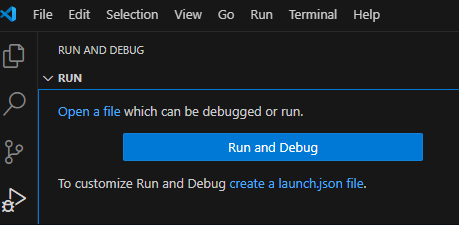
- Click create a launch.json file link in the text. A quick-pick shows:
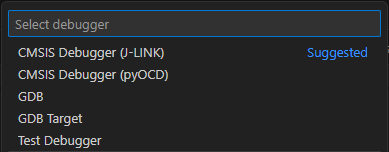
-
Select CMSIS Debugger (pyOCD) or CMSIS Debugger (J-LINK).
-
This creates a new
launch.jsonfile under.vscodepre-filled with the selected default configuration.
Debugging with pyOCD
For debugging with pyOCD, the following is added to the launch.json file:
{
    "configurations": [
        {
            "name": "CMSIS Debugger: pyOCD",
            "type": "gdbtarget",
            "request": "launch",
            "cwd": "${workspaceFolder}",
            "program": "${command:cmsis-csolution.getBinaryFile}",
            "gdb": "arm-none-eabi-gdb",
            "initCommands": [
                "load",
                "break main"
            ],
            "target": {
                "server": "pyocd",
                "port": "3333"
            },
            "cmsis": {
                "cbuildRunFile": "${command:cmsis-csolution.getCbuildRunFile}"
            }
        }
    ]
}
Single-core (pyOCD)
For a single-core device, you need to add the relative path to the HEX file to "initCommands" - "load".
Example
{
    "configurations": [
        {
            "name": "CMSIS Debugger: pyOCD",
            "type": "gdbtarget",
            "request": "launch",
            "cwd": "${workspaceFolder}",
            "program": "${command:cmsis-csolution.getBinaryFile}",
            "gdb": "arm-none-eabi-gdb",
            "initCommands": [
                "load ./out/Blinky/B-U585I-IOT02A/Debug/Blinky.hex",
                "break main"
            ],
            "target": {
                "server": "pyocd",
                "port": "3333"
            },
            "cmsis": {
                "cbuildRunFile": "${command:cmsis-csolution.getCbuildRunFile}"
            }
        }
    ]
}
Multi-core (pyOCD)
For a multi-core device, you need to:
-
for the boot core: add the relative path to the HEX files for both cores to
"initCommands"-"load". -
for the secondary core: comment out the
"initCommands". -
add for each core the relative path to the AXF (ELF) files for each core to
"program".
Example
{
    "configurations": [
        {
            "name": "CM4: CMSIS Debugger: pyOCD",
            "type": "gdbtarget",
            "request": "launch",
            "cwd": "${workspaceFolder}",
            "program": "out/HelloWorld_cm4/FRDM-K32L3A6/Debug/HelloWorld_cm4.axf",
            "gdb": "arm-none-eabi-gdb",
            "initCommands": [
                "load out/HelloWorld_cm4/FRDM-K32L3A6/Debug/HelloWorld_cm4.hex",
                "load out/HelloWorld_cm0plus/FRDM-K32L3A6/Debug/HelloWorld_cm0plus.hex",
                "set $pc = Reset_Handler",
                "break main"
            ],
            "target": {
                "server": "pyocd",
                "port": "3333"
            },
            "cmsis": {
                "cbuildRunFile": "${command:cmsis-csolution.getCbuildRunFile}"
            },
        },
        {
            "name": "CM0+: CMSIS Debugger: pyOCD",
            "type": "gdbtarget",
            "request": "attach",
            "cwd": "${workspaceFolder}",
            "program": "out/HelloWorld_cm0plus/FRDM-K32L3A6/Debug/HelloWorld_cm0plus.axf",
            "gdb": "arm-none-eabi-gdb",
            // "initCommands": [
            //     "load",
            //     "break main"
            // ],
            "target": {
                "server": "pyocd",
                "port": "3334"
            },
        }
    ]
}
Note
In this example, the "set $pc = Reset_Handler", is required to set the program counter to the correct value.
Debugging with J-Link
For debugging with Segger J-Link (using the J-Link GDB Server), the following
is added to the launch.json file:
{
    "configurations": [
    {
        "name": "CMSIS Debugger: J-LINK",
        "type": "gdbtarget",
        "request": "launch",
        "cwd": "${workspaceFolder}",
        "program": "${command:cmsis-csolution.getBinaryFile}",
        "gdb": "arm-none-eabi-gdb",
        "initCommands": [
            "load",
            "break main"
        ],
        "target": {
            "server": "JLinkGDBServer",
            "serverParameters": [
                "-device",
                "${command:cmsis-csolution.getDeviceName}",
                "-endian",
                "little",
                "-if",
                "SWD",
                "-speed",
                "auto",
                "-noir",
                "-vd",
                "-nogui",
                "-localhostonly"
            ],
            "port": "3333"
        }
    }
    ]
}
Single-core (J-Link)
For a single-core device, the configuration template contains all the information that is required to start debugging.
Multi-core (J-Link)
For a multi-core device, you need to:
-
change the
"-device"entry to add processor names. -
create a
JLinkDevices.xmlfile containing entries for all cores (refer to the J-Link Device Support Kit documentation on how to do that). -
add the XML file to the
"serverParameters"so that the Segger GDB server can pick them up.
Example
{
    "version": "0.2.0",
    "configurations": [
        {
            "name": "CMSIS Debugger: J-LINK",
            "type": "gdbtarget",
            "request": "launch",
            "cwd": "${workspaceFolder}",
            "program": "${command:cmsis-csolution.getBinaryFile}",
            "gdb": "arm-none-eabi-gdb",
            "initCommands": [
                "load",
                "break main"
            ],
            "target": {
                "server": "JLinkGDBServer",
                "serverParameters": [
                    "-device",
                    "${command:cmsis-csolution.getDeviceName}_${command:cmsis-csolution.getProcessorName}",
                    "-JLinkDevicesXmlPath",
                    ".alif/JLinkDevices.xml",
                    "-endian",
                    "little",
                    "-if",
                    "SWD",
                    "-speed",
                    "auto",
                    "-noir",
                    "-vd",
                    "-nogui",
                    "-localhostonly"
                ],
                "port": "3333"
            }
        }

    ]
}
For this example, the content of the JLinkDevices.xml file is as follows:
<DataBase>
  <Device>
    <ChipInfo Vendor="AlifSemiconductor" Name="AE722F80F55D5_HP" Aliases="AE722F80F55D5LS_M55_HP; AE722F80F55D5AS_M55_HP" />
  </Device>
  <Device>
    <ChipInfo Vendor="AlifSemiconductor" Name="AE722F80F55D5_HE" Aliases="AE722F80F55D5LS_M55_HE; AE722F80F55D5AS_M55_HE" />
  </Device>
</DataBase>